Recovered my shield in preparation for Crown.

I used Baron Diomedes Sebastianus'
method of covering the shield with canvas (I don't know this man, but stumbled over his website in my search for better, faster, stronger shield decoration). I've really pleased with the results. I painted the canvas, then used a paint pen and Sharpie to draw on the
diapering.
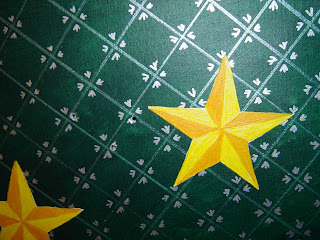
My lovely and considerably more talented wife then painted on the household charge.
Finally, I covered the surface with a 2-part resin. This is a popular method of preserving shields in the MidRealm right now. I'd never used it before, and I was more than a little nervous about it, especially after my squired ruined a fantastic paint job on his shield when the resin he used set up too quickly. In fact, these photos are taken
before applying the coating, because I wanted photographic proof in case everything went belly up. These photos are also before I put the leather edging on, which makes it look much more finished.
I set up the sawhorses in the garage, being that I'd been warned that the fumes on this stuff would addle your brains. And I put down a bunch of newspaper on the floor, since you want a little of the coating to drip off the edge.
The resin is popularly called "Bar Coat" (or maybe "Bar Cote") even though I haven't been able to find a product with that actual name. I used a product called
Envirotext Lite. I got it at
Michael's, but I think it's available at most craft stores (and it looks like it's even available at Joann fabric stores); and you can order it numerous places online. It's not hard to find.
I got the 16-ounce kit (which is two 8oz bottles--one of the resin, and one of the hardener) which is supposed to cover four square feet. I mixed up a little to test, then still had plenty of cover my shield (a 32" x 30 heater). I might have been able to get by with the next smaller size kit (two 4oz bottles) but it would have been a little tight. And I didn't want to take any chances.
I slavishly followed the directions: add the two parts (I used everything that was left in the bottles) mix them vigorously for one minute; pour into a second clean container, mix vigorously for one minute, then pour immediately.
This stuff had the viscosity of a really thick syrup. It slo-owly crept toward the edge of the shield. I ended up spreading it around with a paint stick, not unlike frosting a cake. It's self-leveling, but I helped it along when it looked like it was pooling up along the edge a bit.
The smell wasn't bad at all. I think I could have done the job inside without my wife complaining. Since it's supposed to cure at 70 degrees, this would be the only option if coating a shield in the winter.
I fussed with it for a couple minutes after it was all spread out, scraping the drips from under the edge, trying to build up a little more resin on the leading edge of the shield. But then I walked away for an hour.
It wasn't especially warm the day I did this, probably upper 50s, low 60s. When I came back an hour later it was still pretty soft, I could have easily pushed more of the material around if I wanted to. But it had leveled really well (my shield only has a slight curve) to a nice, smooth surface. I left it for another couple hours and went to see the new Star Trek movie with my wife (which, for the record, was awesome).
When I got back it was firming up, but I was still able to scrap off the drips with a little effort. I tried to open up the holes I had drilled for straps, but they continued to close up. I left it for about six hours.
I was worried about the temperature, so I ended up bringing it inside to my basement shop overnight. I put a space heater next to it, but wasn't able to raise the temperature up much past 65 degrees.
The next morning it was mostly cured, but I think I could have pressed a fingerprint into it if I really tried. I left it along for the rest of the day.
That evening I drilled out the resin from the holes. They drilled out easily, and didn't fracture or crack like I thought them might. In fact, in cleaning up the resin that dripped on the floor, I found it to be incredibly flexible. I could bend a thin sheet of it almost back onto itself without any visible damage.
I finished it up by gluing on some fabric on the inside and reattaching all the hardware and leather edging.
I was a little worried that the gloss on the surface would be obnoxious, but it isn't bad at all. No worse than several coats of a sealer.
I've found in a couple fight practices with it, and it hasn't done more than scuff up a bit. I also took it to a melee event this past weekend, and came home with a few scratches. Given the bumping and shoving it saw, I'm happy with that. None of the scratches were deep enough to reach the canvas below. I may try to apply a little more of the resin to fill the scratches, see how that goes.
All in all, it seems like a great product so far. Here's hoping it lasts.


