On St. Triverius’ Feast Day, in the 44th Year of the Society, Nikolai Grigorevich Petrov, a Knight in good standing with his King, was found in conversation with Logan MacCoinnich of Kintail, likewise a fine Knight. They spoke of many things martial and, in due course, it was revealed that both noble men desired to pick up the shields of their ancestors and cast away the foreign escutcheons with this they currently labored.
However, both men were hesitant, gripped by the fear of being left defenseless in the heat of combat, holding only armor with which they were not well acquainted. It was then that Sir Logan brashly suggested that he spirit away Nikolai’s shield to lands far to the north, for which in return he would offer his own shield to be likewise kidnapped.
Nikolai was indeterminate.
The day continued to pass, both men striving against many stout men in harness. As the sun began to set, Logan did once again approach the Son of Rus and cajoled him to consider the weapons of his homeland. Nikolai, in his great wisdom, was quick to ponder but slow to speak. Seizing this momentary pause, Sir Lucian, a man with which Nikolai had no previous quarrel, did shout from across the hall and demand that Nikolai take this opportunity to behave like a man, least he no longer be considered one.
Nikolai fell to the jibe, and rose to the challenge.
So it came to pass that Nikolai firmly grasped the favored shield of his homelands and made it his own.
Showing posts with label armor. Show all posts
Showing posts with label armor. Show all posts
Thursday, January 21, 2010

Friday, May 15, 2009
New shield
Recovered my shield in preparation for Crown.

I used Baron Diomedes Sebastianus' method of covering the shield with canvas (I don't know this man, but stumbled over his website in my search for better, faster, stronger shield decoration). I've really pleased with the results. I painted the canvas, then used a paint pen and Sharpie to draw on the diapering.
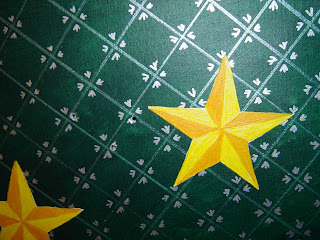 My lovely and considerably more talented wife then painted on the household charge.
Finally, I covered the surface with a 2-part resin. This is a popular method of preserving shields in the MidRealm right now. I'd never used it before, and I was more than a little nervous about it, especially after my squired ruined a fantastic paint job on his shield when the resin he used set up too quickly. In fact, these photos are taken before applying the coating, because I wanted photographic proof in case everything went belly up. These photos are also before I put the leather edging on, which makes it look much more finished.

I used Baron Diomedes Sebastianus' method of covering the shield with canvas (I don't know this man, but stumbled over his website in my search for better, faster, stronger shield decoration). I've really pleased with the results. I painted the canvas, then used a paint pen and Sharpie to draw on the diapering.
 My lovely and considerably more talented wife then painted on the household charge.
Finally, I covered the surface with a 2-part resin. This is a popular method of preserving shields in the MidRealm right now. I'd never used it before, and I was more than a little nervous about it, especially after my squired ruined a fantastic paint job on his shield when the resin he used set up too quickly. In fact, these photos are taken before applying the coating, because I wanted photographic proof in case everything went belly up. These photos are also before I put the leather edging on, which makes it look much more finished.
I set up the sawhorses in the garage, being that I'd been warned that the fumes on this stuff would addle your brains. And I put down a bunch of newspaper on the floor, since you want a little of the coating to drip off the edge.
The resin is popularly called "Bar Coat" (or maybe "Bar Cote") even though I haven't been able to find a product with that actual name. I used a product called Envirotext Lite. I got it at Michael's, but I think it's available at most craft stores (and it looks like it's even available at Joann fabric stores); and you can order it numerous places online. It's not hard to find.
I got the 16-ounce kit (which is two 8oz bottles--one of the resin, and one of the hardener) which is supposed to cover four square feet. I mixed up a little to test, then still had plenty of cover my shield (a 32" x 30 heater). I might have been able to get by with the next smaller size kit (two 4oz bottles) but it would have been a little tight. And I didn't want to take any chances.
I slavishly followed the directions: add the two parts (I used everything that was left in the bottles) mix them vigorously for one minute; pour into a second clean container, mix vigorously for one minute, then pour immediately.
This stuff had the viscosity of a really thick syrup. It slo-owly crept toward the edge of the shield. I ended up spreading it around with a paint stick, not unlike frosting a cake. It's self-leveling, but I helped it along when it looked like it was pooling up along the edge a bit.
The smell wasn't bad at all. I think I could have done the job inside without my wife complaining. Since it's supposed to cure at 70 degrees, this would be the only option if coating a shield in the winter.
I fussed with it for a couple minutes after it was all spread out, scraping the drips from under the edge, trying to build up a little more resin on the leading edge of the shield. But then I walked away for an hour.
It wasn't especially warm the day I did this, probably upper 50s, low 60s. When I came back an hour later it was still pretty soft, I could have easily pushed more of the material around if I wanted to. But it had leveled really well (my shield only has a slight curve) to a nice, smooth surface. I left it for another couple hours and went to see the new Star Trek movie with my wife (which, for the record, was awesome).
When I got back it was firming up, but I was still able to scrap off the drips with a little effort. I tried to open up the holes I had drilled for straps, but they continued to close up. I left it for about six hours.
I was worried about the temperature, so I ended up bringing it inside to my basement shop overnight. I put a space heater next to it, but wasn't able to raise the temperature up much past 65 degrees.
The next morning it was mostly cured, but I think I could have pressed a fingerprint into it if I really tried. I left it along for the rest of the day.
That evening I drilled out the resin from the holes. They drilled out easily, and didn't fracture or crack like I thought them might. In fact, in cleaning up the resin that dripped on the floor, I found it to be incredibly flexible. I could bend a thin sheet of it almost back onto itself without any visible damage.
I finished it up by gluing on some fabric on the inside and reattaching all the hardware and leather edging.
I was a little worried that the gloss on the surface would be obnoxious, but it isn't bad at all. No worse than several coats of a sealer.
I've found in a couple fight practices with it, and it hasn't done more than scuff up a bit. I also took it to a melee event this past weekend, and came home with a few scratches. Given the bumping and shoving it saw, I'm happy with that. None of the scratches were deep enough to reach the canvas below. I may try to apply a little more of the resin to fill the scratches, see how that goes.
All in all, it seems like a great product so far. Here's hoping it lasts.
Wednesday, May 6, 2009
Complete kit
Finished up my new lamellar couple of weeks ago. The worst part was punching all the holes for the edging. I don't have any good photos of it, but I do have this video:
I'm even playing with my new tear drop center-grip! I like the way it moves, and I love the way it looks with my kit... I just need to get better at using it to block shots.
I'm even playing with my new tear drop center-grip! I like the way it moves, and I love the way it looks with my kit... I just need to get better at using it to block shots.
My lady is working on some new fighting clothes for Crown, which should be really sweet. But for the most part, this is my new kit, complete.
Sunday, February 1, 2009
Another upgrade
Every since I got my new helmet, I've been wanting to upgrade my plastic lamellar. After Christmas I finally pulled the trigger.

That's 500 aluminum plates from Eldesarian Metal Works. I went with the brass anodized to keep the same golden look that I had with my plastic. I'm really pleased with how they look. They're a little more matte in finish than my plastic, and I think that'll look really good with my helmet, since the brasswork has an antiqued look; it's not bright and shiny.
I've ordered cord (ironically, from the plastic lamellar guys, they had the best prices and cheapest shipping I could find) and once it gets here, I'll start banging this thing together.
Once the vest is completed, I'm going to look pretty rockin' on the field. After I got my helmet and posted a few photos on Armour Archive I was contacted by someone from the Warriors of History website asking if I had any full body photos so they could add me to the site. This totally blew me away because my kit has been barely historic sport armor for-EVER. Never would I have imagined that I would be held up as an inspiration. I was incredibly flattered.
That said, I declined the offer because my kit wasn't there, not yet. Not with the plastic body armor.
But now, once I get this vest done, I'm going to take advantage of the kind offer and send them some photos. Well, after I do something about the footwear, too. Oh, and I suppose I'll need a tear drop shield, too. Does it ever end?
I'm totally an armor snob now.

That's 500 aluminum plates from Eldesarian Metal Works. I went with the brass anodized to keep the same golden look that I had with my plastic. I'm really pleased with how they look. They're a little more matte in finish than my plastic, and I think that'll look really good with my helmet, since the brasswork has an antiqued look; it's not bright and shiny.
I've ordered cord (ironically, from the plastic lamellar guys, they had the best prices and cheapest shipping I could find) and once it gets here, I'll start banging this thing together.
Once the vest is completed, I'm going to look pretty rockin' on the field. After I got my helmet and posted a few photos on Armour Archive I was contacted by someone from the Warriors of History website asking if I had any full body photos so they could add me to the site. This totally blew me away because my kit has been barely historic sport armor for-EVER. Never would I have imagined that I would be held up as an inspiration. I was incredibly flattered.
That said, I declined the offer because my kit wasn't there, not yet. Not with the plastic body armor.
But now, once I get this vest done, I'm going to take advantage of the kind offer and send them some photos. Well, after I do something about the footwear, too. Oh, and I suppose I'll need a tear drop shield, too. Does it ever end?
I'm totally an armor snob now.
Monday, September 8, 2008
Harvest Day TOC 09/08
I've been pouring all the photos from Pennsic I could find... and I can't see myself in any of them. Not a one! I mean, I was there in all the battles, you'd think that ONE person would take a quick snap of me in my new armor.
 The first full body shot of me in my new rig, including the tunic now that it has trim on it. The heater shield doesn't really enhance the look, but it's what I know.
 The Russian Knight fighting a real Russian. Dimitri is a good guy, and gave me a hard fight. Plus, he can actually read the inscription on my helm.

So this weekend at Harvest Day, I spotted Nivek and asked him to take a few photos of me, if he got the chance. And not only did he take some photos, he emailed them to me the very next day. Awesome.
 The first full body shot of me in my new rig, including the tunic now that it has trim on it. The heater shield doesn't really enhance the look, but it's what I know.
 The Russian Knight fighting a real Russian. Dimitri is a good guy, and gave me a hard fight. Plus, he can actually read the inscription on my helm.
Look at the sky reflecting off that damn thing. Can you stand it? Big change from the rusty spun-top I used to wear.
Thursday, July 3, 2008

Friday, June 27, 2008
Full kit
Finally got some photos from Rose Tournament--the first time I wore my new helm and new fighting clothes. I gotta say, I'm really pretty happy with my on-the-field appearance right now.


I still need to make some tweaks--the naruchi (i.e., bazubands) are the big thing. Then I need to extend my greaves so they cover my boot laces; then... well, after that it's small stuff. Trim on the tunic so I look fancier. Greaves mark 2 with tooling. New metal lamallar (but that's kinda expensive, so it's farther down the road).
This is the best I've looked in armor EVER. Dare I say it? I look like a Knight.
Finally.


I still need to make some tweaks--the naruchi (i.e., bazubands) are the big thing. Then I need to extend my greaves so they cover my boot laces; then... well, after that it's small stuff. Trim on the tunic so I look fancier. Greaves mark 2 with tooling. New metal lamallar (but that's kinda expensive, so it's farther down the road).
This is the best I've looked in armor EVER. Dare I say it? I look like a Knight.
Finally.
Sunday, June 24, 2007
Arm armor update
More progress!
I modified the pattern a bit, made a cardboard template and cut out the leather. I'm only making one to start (the right). If the pattern works out, I'll do the left the same way; the pattern isn't specific to the right or left.
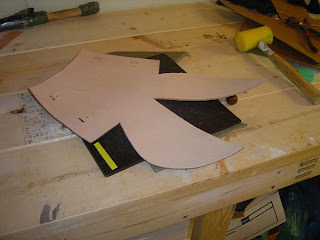 About you see the leather cut to shape, with holes punched for straps and stitching. I forgot to allow a slight overage for shrinkage when waxing (even though I wrote on the pattern "allow 1/4" for wax shrinkage!") but, since this is the first attempt, I just left it be. We'll see how it goes after wax is applied.
 Above is the back-end halfway stitched up.
I modified the pattern a bit, made a cardboard template and cut out the leather. I'm only making one to start (the right). If the pattern works out, I'll do the left the same way; the pattern isn't specific to the right or left.
 About you see the leather cut to shape, with holes punched for straps and stitching. I forgot to allow a slight overage for shrinkage when waxing (even though I wrote on the pattern "allow 1/4" for wax shrinkage!") but, since this is the first attempt, I just left it be. We'll see how it goes after wax is applied.
 Above is the back-end halfway stitched up.
 I cased the leather (that is, soaked it in warm water) and let it dry for about eight minutes before bending it to shape, above. That's Lily's mini-basketball in the center; my hope was that it would give the elbow a rounded profile.

Hanging up to dry. I was hoping that it would dry more evenly if suspected from the ceiling.
 The next day. It's still damp in this photo and took most of the day to dry completely. An unexpected benefit of tying up the ball inside the elbow was the cool scalloped shape around the elbow. I like it a lot.
Tonight I'm going to wax it and hope to have it ready to fight in come fight practice on Wednesday.
Tuesday, June 19, 2007
Arm armor
I've made progress on the arm armor (e.g., naruchi). The House of the Wolf leather armor page has a really nice tutorial on how he makes his bazubands. The pattern he's using isn't exactly what I'm looking for, but it's a really nice place to start. I also looked up Duke Cariadoc's "The Perfect Armor" article just to review what he has to say. I like the shape of his bazubands better, but not the pattern he's using. I cut out a pattern the other night, but now I'm thinking I need to tweak it a bit. Once I have the pattern I want, it's a small matter of cutting out the leather and actually waxing it. That won't take long. I'll make a right-handed model and wear it to fight practice a couple of times, see how it feels. If all is right, then I'll make the matching left.
Have to check my beeswax supply, too.
Have to check my beeswax supply, too.
Friday, May 25, 2007
Final Crown prep
My helmet is currently drying in the garage (I repainted the bars black). I took the wire wheel to the dome earlier today. It's certainly not a mirror finish, but it's much better than it was. It had some rust on a few spots, but most of it was just patina. And I know it sounds like BS from someone just too lazy to keep their kit spotless... but I like the patina. That's why I think I'm sold on getting a mild helmet, not stainless (and the cost savings, too).
The trip to Tandy Leather today was a big success. They had everything I needed (and much more). After the sad trip to Cleveland Leather, it's nice to go to a fully stocked, well organized and well lit store. It lacks the charm of Cleveland Leather, of course, but that's a price I'll gladly pay to actually be able to pick up what I need.
Right now Serena is in the basement painting the household device on my shield. It's going to look sharp. She also needs to mend my fighting pants; tonight, I hope.
I need to dye the straps on my body armor tonight. Tomorrow I'll finish that second sword (or tonight, if I get ambitious). And that's it. Except for the fightin'.
The trip to Tandy Leather today was a big success. They had everything I needed (and much more). After the sad trip to Cleveland Leather, it's nice to go to a fully stocked, well organized and well lit store. It lacks the charm of Cleveland Leather, of course, but that's a price I'll gladly pay to actually be able to pick up what I need.
Right now Serena is in the basement painting the household device on my shield. It's going to look sharp. She also needs to mend my fighting pants; tonight, I hope.
I need to dye the straps on my body armor tonight. Tomorrow I'll finish that second sword (or tonight, if I get ambitious). And that's it. Except for the fightin'.
Wednesday, May 23, 2007
Elbow update
I hadn't intended on tearing apart my elbows, but after Baron Wars I needed to replace both straps... and when I looked at the leather "articulation" on both, I saw the leather was starting to fail. so I popped out all the rivets and redid it. And while I had it in pieces, I dyed the leather black. Put everything back together last night, and it looks good.
But it doesn't feel good.
I was worried about the buckles, so I replaced them with newer, slightly larger ones. When I put then on in my basement they felt clunky, like there was a lot of stuff bunching up in the inside bend of my elbow. That might also just be the new elbow pads I bought (for the first time in maybe 8 years). I suspect it's the pads. Tonight I'm going to go with my old pads, I think, see how it feels. But these new pads will work great with my new naruchi, when they're built.
I also cut a length of rattan for a second sword. I'll get that finished Friday, I think. All that's left is painting my shield (which my lovely lady has volunteered to do) and scraping the rust off my helmet (probably a bigger job than I think). Oh, and I also fixed the thumb on my new gaunts. I pounded the crap out of the rivet, so I don't think it's going anywhere.
I'm happy to report that last night's repairs involved drills, boxcutters, razor blades, screwdrivers and hammers... and I managed to get everything done without hurting myself in any way! Now that I've written that, I'm sure I'll tear off a hunk of my arm while I'm buffing my helmet.
But it doesn't feel good.
I was worried about the buckles, so I replaced them with newer, slightly larger ones. When I put then on in my basement they felt clunky, like there was a lot of stuff bunching up in the inside bend of my elbow. That might also just be the new elbow pads I bought (for the first time in maybe 8 years). I suspect it's the pads. Tonight I'm going to go with my old pads, I think, see how it feels. But these new pads will work great with my new naruchi, when they're built.
I also cut a length of rattan for a second sword. I'll get that finished Friday, I think. All that's left is painting my shield (which my lovely lady has volunteered to do) and scraping the rust off my helmet (probably a bigger job than I think). Oh, and I also fixed the thumb on my new gaunts. I pounded the crap out of the rivet, so I don't think it's going anywhere.
I'm happy to report that last night's repairs involved drills, boxcutters, razor blades, screwdrivers and hammers... and I managed to get everything done without hurting myself in any way! Now that I've written that, I'm sure I'll tear off a hunk of my arm while I'm buffing my helmet.
Monday, May 21, 2007
Notes on Baron Wars
Fought in my new (or more properly, improved) gaunts... and managed to pop off a thumb the very first battle. I don't know how it happened; I was in a bad spot in the first field battle--which isn't uncommon, because I'm a rather weak open-field spear--and I was pushed back over a pile of bodies. I went down hard, and there were immediately three guys (the same ones chasing me down) helping me up and saying "Your gauntlets broke--here's your thumb.") I was pissed, but managed to affect a repair and get back before the next battle began. And naturally, when I say repair, I mean I wrapped a bunch of duct tape around the damn thing. I really wanted to avoid duct tape on these things, but I even more so wanted to keep fighting. I see what happened--the rivet on the thumb cap wasn't peened down as much as it should be. My bad. I'll clean them up tonight and pound the crap out of it.
I also broke straps on both elbows. Since my elbows are only held on with one strap, I again had to wrap duct tape all around to keep them on. Fortunately, the second one broke just as fighting was ending for the day. Regardless, now I have to replace both straps. But, better to happen at Baron Wars than this weekend at Crown.
And making naruchi has gone to the top of my to-do list; mostly because I got the shit beat out of my forearms this weekend. I'm going to take the leather I had earmarked for greaves and turn them into arm protection. I also need to look for a smaller metal buckler to wear on my left hand when I'm fighting spear. I'll try to pick one up at Pennsic.
Last things to do before Crown: cut a second sword, and grind the rust off my helmet. I’m also going to try to get to Tandy Leather and buy some brown dye and dye all the straps on my body armor. And replace the shoulder straps with prettier ones, if I have time. And that's as good as it's going to get, I'm afraid.
I also broke straps on both elbows. Since my elbows are only held on with one strap, I again had to wrap duct tape all around to keep them on. Fortunately, the second one broke just as fighting was ending for the day. Regardless, now I have to replace both straps. But, better to happen at Baron Wars than this weekend at Crown.
And making naruchi has gone to the top of my to-do list; mostly because I got the shit beat out of my forearms this weekend. I'm going to take the leather I had earmarked for greaves and turn them into arm protection. I also need to look for a smaller metal buckler to wear on my left hand when I'm fighting spear. I'll try to pick one up at Pennsic.
Last things to do before Crown: cut a second sword, and grind the rust off my helmet. I’m also going to try to get to Tandy Leather and buy some brown dye and dye all the straps on my body armor. And replace the shoulder straps with prettier ones, if I have time. And that's as good as it's going to get, I'm afraid.
Wednesday, May 16, 2007
Body armor -- DONE!
Finished strapping the lamellar last night. I'm happy with the fit. I still need to twist around a little awkwardly to get the thing on, but I can do it by myself.
Looking for supplies to finish it last night was a big bust. Since Cleveland Leather didn't have the dye I wanted, I stopped at both Pat Catan's and Michael's, neither had any leather dye. Then I stopped at Home Depot to pick up a few more brass washers and they were sold out of the size I wanted. So the straps are just oiled, and they look pale. I got galvanized washers instead of brass. These are (hopefully) little details that only I notice. Because honestly, I'm happy with the overall appearance... if you don't look too closely, it's a good-looking rig. It's a great Mark I version.
I also cut a new sword last night. After struggling with fitting the lamellar, I was happily surprised at how quick and easy it was to make a sword. The big difference is experience, I guess... I'm never worn lamellar before, but I've been making swords for 20 years. I fitted it with a new basket hilt I've had floating around in my basement forever; the old basket will become my left-handed sword, which is yet to be made.
So, as far as my previous Crown-prep to-do list:
Finish my gauntlets: DONE
Revisit my body armor: DONE
Cut new swords: 50% done
Recover my shield: DONE
Revisit my helmet: I've done nothing with this, but I have some ideas. And I have enough time that I don't need to rush on this.
Make new greaves: Not done. Cleveland Leather didn't have the leather I wanted for this, but I think I have some leftovers that can work. This isn't critical, but it would really improve the appearance of my kit.
Make naruchi: This isn't going to happen before Crown. Maybe before Pennsic, if I really stay focused.
All in all, not bad progress at all, especially when you consider how lazy I am.
Looking for supplies to finish it last night was a big bust. Since Cleveland Leather didn't have the dye I wanted, I stopped at both Pat Catan's and Michael's, neither had any leather dye. Then I stopped at Home Depot to pick up a few more brass washers and they were sold out of the size I wanted. So the straps are just oiled, and they look pale. I got galvanized washers instead of brass. These are (hopefully) little details that only I notice. Because honestly, I'm happy with the overall appearance... if you don't look too closely, it's a good-looking rig. It's a great Mark I version.
I also cut a new sword last night. After struggling with fitting the lamellar, I was happily surprised at how quick and easy it was to make a sword. The big difference is experience, I guess... I'm never worn lamellar before, but I've been making swords for 20 years. I fitted it with a new basket hilt I've had floating around in my basement forever; the old basket will become my left-handed sword, which is yet to be made.
So, as far as my previous Crown-prep to-do list:
Finish my gauntlets: DONE
Revisit my body armor: DONE
Cut new swords: 50% done
Recover my shield: DONE
Revisit my helmet: I've done nothing with this, but I have some ideas. And I have enough time that I don't need to rush on this.
Make new greaves: Not done. Cleveland Leather didn't have the leather I wanted for this, but I think I have some leftovers that can work. This isn't critical, but it would really improve the appearance of my kit.
Make naruchi: This isn't going to happen before Crown. Maybe before Pennsic, if I really stay focused.
All in all, not bad progress at all, especially when you consider how lazy I am.
Tuesday, May 15, 2007
Armor update
Took off work yesterday to work on armor. First, I drove down to Cleveland Leather. Now, anyone who has ever gone there knows that Cleveland Leather is a shithole. Decaying boxes of old rubber boot heels and leather scraps and dried up bottle of leather dye litter the aisles. A thick layer of grey dust coats everything. However, it has its charm. The old man (I never shopped there enough to learn anyone's name) who ran it was pretty knowledgeable about leather, and seemed to be a really nice guy, to boot.
One time I walked in there and asked for a double shoulder of tooling leather. As he walked me back into the dank bowels of the place he said, over his should, "So, what kind of armor are you making?" I have no idea how he knew I was buying leather for armor, I hadn't said anything about the SCA or fighting. I guess that after decades of selling hides he could just tell.
Sadly, when I was there on Monday there was a framed photo of him on the wall, with the words "In Memoriam" underneath.
This time, the dilapidated state of the place was even worse than usual. There was only one guy working there (the deliverance guy, you know who I'm talking about) and he had a total of three natural hides in the place. Three. In the past I've been there and they have dozens of different weights; this time? Three total, all eight ounce. He took a call while I was there and said something about "going out of business." That, and the big "CLEARANCE!" sign on the front door leads me to believe that Cleveland Leather isn't long for this world. It's a pity, really... I'll have to go to some modern leather store (if I can find one) and shop their brightly lit, well-stocked aisles; which will be more convenient, but no where near as interesting as pawing through shelves stacked ceiling high with leather scraps, mis-matched buckles and other peculiar odds and ends.
Anyway, this post is supposed to be about armor.
I took apart my lamellar and removed about 40 plates. These were overlap on the sides, so I think I can get away with it (I really need to get a lightly padded gambeson to wear under it to soak up some of the sting, though). I moved the buckles forward, and I think I'll be able to dress myself now. I didn't end up riveting anything on yet, I still need to dye the straps. Something I would have done yesterday, but the leather place didn't have any brown dye.
I did pick up some soft brown lambskin, and started edging the lamellar with it. I'm really not happy at all with how it turned out, but it's good enough for the Mark I version. And, considering I was up until 2:30am lacing the damn thing, it's going to stay on for now.
I figured out how to attach my existing leather paldrons to the shoulder straps; again, not the optimal look, but good enough for now.
Tonight I'll pick up some leather dye and finish and attach the straps. I need to get this damn body armor working so I can fight in it at the Wednesday night fight practice. Lord knows I can't afford to miss another practice this close to Crown.
I also painted my basket hilt and put the entire shield back together. I have to say, my shield has never looked more professional; I'm thrilled with how it looks. My wife wants to wait until it's closer to Crown before painting the household arms on it; once that's done it will look amazing.
Next up: cut out two new swords. I'm going to try to get that done tonight, too. My current sword is broomed out something fierce.
One time I walked in there and asked for a double shoulder of tooling leather. As he walked me back into the dank bowels of the place he said, over his should, "So, what kind of armor are you making?" I have no idea how he knew I was buying leather for armor, I hadn't said anything about the SCA or fighting. I guess that after decades of selling hides he could just tell.
Sadly, when I was there on Monday there was a framed photo of him on the wall, with the words "In Memoriam" underneath.
This time, the dilapidated state of the place was even worse than usual. There was only one guy working there (the deliverance guy, you know who I'm talking about) and he had a total of three natural hides in the place. Three. In the past I've been there and they have dozens of different weights; this time? Three total, all eight ounce. He took a call while I was there and said something about "going out of business." That, and the big "CLEARANCE!" sign on the front door leads me to believe that Cleveland Leather isn't long for this world. It's a pity, really... I'll have to go to some modern leather store (if I can find one) and shop their brightly lit, well-stocked aisles; which will be more convenient, but no where near as interesting as pawing through shelves stacked ceiling high with leather scraps, mis-matched buckles and other peculiar odds and ends.
Anyway, this post is supposed to be about armor.
I took apart my lamellar and removed about 40 plates. These were overlap on the sides, so I think I can get away with it (I really need to get a lightly padded gambeson to wear under it to soak up some of the sting, though). I moved the buckles forward, and I think I'll be able to dress myself now. I didn't end up riveting anything on yet, I still need to dye the straps. Something I would have done yesterday, but the leather place didn't have any brown dye.
I did pick up some soft brown lambskin, and started edging the lamellar with it. I'm really not happy at all with how it turned out, but it's good enough for the Mark I version. And, considering I was up until 2:30am lacing the damn thing, it's going to stay on for now.
I figured out how to attach my existing leather paldrons to the shoulder straps; again, not the optimal look, but good enough for now.
Tonight I'll pick up some leather dye and finish and attach the straps. I need to get this damn body armor working so I can fight in it at the Wednesday night fight practice. Lord knows I can't afford to miss another practice this close to Crown.
I also painted my basket hilt and put the entire shield back together. I have to say, my shield has never looked more professional; I'm thrilled with how it looks. My wife wants to wait until it's closer to Crown before painting the household arms on it; once that's done it will look amazing.
Next up: cut out two new swords. I'm going to try to get that done tonight, too. My current sword is broomed out something fierce.
Sunday, May 13, 2007
Gauntlets are done!
Progress! I finished up my gauntlets yesterday. The work wasn't hard, but I had to fiddle with getting the straps just so, and it took longer than it should have. But now that they're done, I hope I don't have to mess with them for another eight years. And, by the way, I think they look fantastic!

You can't really tell from this photo, but the fabric I used to cover them is a snazzy brocade. I'm really pleased with how they turned out. So much so, that I think I'm much less likely to just slap a bunch of duct tape on them if something breaks.
In other Crown armor notes, I covered my shield with fabric. It's a green "bottomweight" (whatever that means) but it's sorta like trigger, I guess. Or maybe it is a kind of trigger. I dunno. It looks like durable stuff. The only problem was that the contact cement I used bled through the fabric, leaving ugly white adhesive marks on the visible side. So, I'm going to have to paint the entire thing green anyway. And I have to get on that right away, because my wife is going to paint the household arms on my shield. She's rather talented, so I'm sure it'll look great.
Finally, I had a bit of downtime between projects, so I cut some rattan for my Pennsic hold-out weapon. But not just any rattan, it was the FORK OF EVIL!

Here's the story: years ago, when I was group marshal for the Marche of Tirnewydd, I ran a "Good vs. Evil" tourney at our traditional end-of-the-month mini-event. Basically, before each bout the fighters had to randomly draw from a bucket to see if they were "good" or "evil" for the fight. The "good" fighters got to use "The Hammer of Righteousness" and the "evil" fighters got to use the above pitchfork. Which, I should add, is in no way a legal weapon in the SCA. It was a good time (and once again, just for the record, I had nothing to do with Lord Tigernach (mundanely, a Catholic priest) having to use the "Fork of Evil" -- the list mistress rigged it, because she though it would be funny; which it was).
So this thing has been sitting in my basement for years. It's a big, fat stick, and will be perfect for the axe I want to make (I'll be able to shave down one side considerably so I can tell the orientation of the head without having to look).

You can't really tell from this photo, but the fabric I used to cover them is a snazzy brocade. I'm really pleased with how they turned out. So much so, that I think I'm much less likely to just slap a bunch of duct tape on them if something breaks.
In other Crown armor notes, I covered my shield with fabric. It's a green "bottomweight" (whatever that means) but it's sorta like trigger, I guess. Or maybe it is a kind of trigger. I dunno. It looks like durable stuff. The only problem was that the contact cement I used bled through the fabric, leaving ugly white adhesive marks on the visible side. So, I'm going to have to paint the entire thing green anyway. And I have to get on that right away, because my wife is going to paint the household arms on my shield. She's rather talented, so I'm sure it'll look great.
Finally, I had a bit of downtime between projects, so I cut some rattan for my Pennsic hold-out weapon. But not just any rattan, it was the FORK OF EVIL!

Here's the story: years ago, when I was group marshal for the Marche of Tirnewydd, I ran a "Good vs. Evil" tourney at our traditional end-of-the-month mini-event. Basically, before each bout the fighters had to randomly draw from a bucket to see if they were "good" or "evil" for the fight. The "good" fighters got to use "The Hammer of Righteousness" and the "evil" fighters got to use the above pitchfork. Which, I should add, is in no way a legal weapon in the SCA. It was a good time (and once again, just for the record, I had nothing to do with Lord Tigernach (mundanely, a Catholic priest) having to use the "Fork of Evil" -- the list mistress rigged it, because she though it would be funny; which it was).
So this thing has been sitting in my basement for years. It's a big, fat stick, and will be perfect for the axe I want to make (I'll be able to shave down one side considerably so I can tell the orientation of the head without having to look).
Thursday, May 10, 2007
Crown prep
I received confirmation yesterday that I will be part of the 32-man list for Their Majesties, Dag and AnneMarie's Crown Tournament.
That's 17 days from today. I need to get my poop in a group and make sure I'm ready. Appearance-wise, that is. There's not a lot I can do in two weeks to skyrocket my prowess (but I do need to practice with this smaller shield some more).
Here's what absolutely needs to be done with my kit before the tourney:
>Finish my gauntlets.
I'd say I'm 90% done already; one is completely together except for the thumb, and I just need to put the other one back together. This has been a little fiddly and time consuming, but certainly not difficult.
>Revist my body armor.
The lamellar is completely funtional right now, but there's two issues: one is that the straps are still raw leather and are a little ugly; and the other thing--the big thing--is that the way it's strapped right now I can't get into it by myself. It's always been a personal rule that I can get into and out of my armor completely by myself, without any outside assistance. So I'm going to re-strap them. I think all I need to do is bring the buckles forward a bit. I like the profile better when the buckles are far in the back, but I'd rather have a slightly clunky profile than have to bug people to strap me up before every practice.
I also have to do something about the paldrons. I don't have any right now, and I haven't paid the price for that yet, but it's only a matter of time. I need something covering my shoulders. I like what Sir Dilan has done, I may do something similar. The paldrons are actually optional for Crown, I can do fine without; but I'd rather not. Finally, I need to finish the edges of the lamellar with some thin leather; it presents such a nice finished look.
>Cut new swords.
My sword is mush at the end right now. I've strapped it down as hard as I could to get a few more swings out of it, but no way that'll cut it for Crown. And, since it's possible that I'll have to fight 2-sword at some point, I'll cut a second sword, too. I already have a matching basket.
>Recover my shield.
It's all strapped up, I just need to cover it with fabric. This is a quick and easy job.
And that's really all that's mandatory. Other things I'd like to do, if there's time:
>Revisit my helmet.
This damn helmet. It's a low-rent spun top bar grill, nothing fancy at all. As a Knight I really should be wearing something better. I've tried to commission a custom helm but, apparently, every armorer in the SCA is a big fucking flake (or, I'm just sour since the last two armorers I dealt with each gave me the big "oh yeah, no problem, this will be great!" rah-rah than fed me two years of excuses and fell off the face of the earth, respectfully).
Anyway, now I'm thinking that I just make the best of what I have: add some simple brasswork, maybe add a fabric drape... I already have the brass knob on the top. It could work.
>Make new greaves.
I'd like to make something that better stays in place (my current greaves are forever twisting around my leg) and mimics the look of a tall Russian boot. I think this will be a simple project, really, I just need to get to it.
>Make bazubands.
Or, more properly, a pair of naruch.


As the illustrations demonstrate,naruches naruchi can be really fancy-pants. I'm going to make them out of leather. I always assumed I'd wax the leather, but lately I've started to re-consider. I think I could just water-harden them and they would be fine. My concern is this: I plan on decorating them with the same fat brass rivets I have in my gauntlets (which look awesome, by the way) and if I wax the leather, I'll have to re-wax it every now and again... meaning I either have to pull all those rivets, or risk burning the leather as the rivets heat up in the oven. This happened to me before with my wax-hardened paldrons.
But, the chances that I'll remake my arm armor in a way I've never done before just two weeks before Crown is very, very slim. I'm already fighting with a shield that's 2" shorter in both directions, I don't need to be figuring out new arms at the same time.
So that's all I need to do for Crown. Oh, and win.
That's 17 days from today. I need to get my poop in a group and make sure I'm ready. Appearance-wise, that is. There's not a lot I can do in two weeks to skyrocket my prowess (but I do need to practice with this smaller shield some more).
Here's what absolutely needs to be done with my kit before the tourney:
>Finish my gauntlets.
I'd say I'm 90% done already; one is completely together except for the thumb, and I just need to put the other one back together. This has been a little fiddly and time consuming, but certainly not difficult.
>Revist my body armor.
The lamellar is completely funtional right now, but there's two issues: one is that the straps are still raw leather and are a little ugly; and the other thing--the big thing--is that the way it's strapped right now I can't get into it by myself. It's always been a personal rule that I can get into and out of my armor completely by myself, without any outside assistance. So I'm going to re-strap them. I think all I need to do is bring the buckles forward a bit. I like the profile better when the buckles are far in the back, but I'd rather have a slightly clunky profile than have to bug people to strap me up before every practice.
I also have to do something about the paldrons. I don't have any right now, and I haven't paid the price for that yet, but it's only a matter of time. I need something covering my shoulders. I like what Sir Dilan has done, I may do something similar. The paldrons are actually optional for Crown, I can do fine without; but I'd rather not. Finally, I need to finish the edges of the lamellar with some thin leather; it presents such a nice finished look.
>Cut new swords.
My sword is mush at the end right now. I've strapped it down as hard as I could to get a few more swings out of it, but no way that'll cut it for Crown. And, since it's possible that I'll have to fight 2-sword at some point, I'll cut a second sword, too. I already have a matching basket.
>Recover my shield.
It's all strapped up, I just need to cover it with fabric. This is a quick and easy job.
And that's really all that's mandatory. Other things I'd like to do, if there's time:
>Revisit my helmet.
This damn helmet. It's a low-rent spun top bar grill, nothing fancy at all. As a Knight I really should be wearing something better. I've tried to commission a custom helm but, apparently, every armorer in the SCA is a big fucking flake (or, I'm just sour since the last two armorers I dealt with each gave me the big "oh yeah, no problem, this will be great!" rah-rah than fed me two years of excuses and fell off the face of the earth, respectfully).
Anyway, now I'm thinking that I just make the best of what I have: add some simple brasswork, maybe add a fabric drape... I already have the brass knob on the top. It could work.
>Make new greaves.
I'd like to make something that better stays in place (my current greaves are forever twisting around my leg) and mimics the look of a tall Russian boot. I think this will be a simple project, really, I just need to get to it.
>Make bazubands.
Or, more properly, a pair of naruch.


As the illustrations demonstrate,
But, the chances that I'll remake my arm armor in a way I've never done before just two weeks before Crown is very, very slim. I'm already fighting with a shield that's 2" shorter in both directions, I don't need to be figuring out new arms at the same time.
So that's all I need to do for Crown. Oh, and win.
Tuesday, May 8, 2007
Gauntlet rework
I've had a pair of black plastic Egg Armory mitten gauntlets forever. They've served me well, even if they've never looked that great. I didn't strap them especially well when I first got them, and have repaired them with layer after layer of duct tape ever since. This didn't particularly bother me... they continued to protect my hands well, and that's the sole reason I bought them. But my squires began to ride my ass about how crappy they looked and, finally, I began to listen.
You will find this to be a continuing theme on this blog: I was pretty happy with the status quo until I got squires. I’ve really lucky to have these guys; they push me to improve in practically every way. I mean, I can’t very well let my squires look better than I do on the field, right?
Anyway, my trusty gauntlets gave up the ghost at Blackstone Raids (2007). That is to say, the originally nylon strapping finally rotted away. The kydex itself is still solid. So I undertook the project of fixing them right (i.e., no duct tape!)
First, I had to remove all the rivets. This was a pain in the ass. Generally with a project like this I just grind off the heads using my bench grinder and pop them out. But since the guants are made of plastic, I had to be careful not to heat up the rivet so much that the plastic melted.
I tried dipping them in water every couple of seconds, and even sat them in a shallow pan of ice water while I used my dremel tool tool on them. Finally, I got frustrated with the slow pace and went ahead and let them get hot and just yanked the entire rivet (burr included) out. This damaged the hole a bit, but I’m not too worried since I have to drill out those holes anyway to accept the bigger brass rivets I’m going to use to put them all back together. I’m a little concerned that I’ve weakened the plastic at those holes and the plastic will crack. Time will tell, I suppose.
Before I started taking them apart (actually, long before the nylon finally died) I was thinking of ways I could make my ugly plastic gaunts look decent. My meager research into Rus arms and armor yielded a very interesting item: the Rukavitsa.


They are described as mittens or gauntlets, and were made of leather or quilted padding, sometimes augmented with “metal fishnet” (I’m assuming that’s equivalent to chain mail?) or metal plates. And, as is obvious from the above illustrations, they are elaborated decorated. Very cool.
So I had to decide how to recreate that with my plastic guants. My first thought was to just make fabric mittens and slip them over the (repaired) gauntlets. With a lightweight suede for the palm, perhaps? However, I had afraid they would look bulky and wouldn’t work well -- and, I image they would be really hot. My hands get sweaty enough without adding another layer of non-breatheable fabric. So, I decided to simply cover the individual plates with fabric.
Last night I thoroughly washed everything and got all the duct tape residue I could off, then cut out fabric to cover them. I was lucky in that my wife, Serena, had cool fabric in the scrap box I could use. I choose a nice red brocade-like fabric (I honestly have no idea with it really is). The Rus loved the color red, and that will made a nice dramatic color highlight to the rest of my rig. I also choose a patterned green to cover just the cuffs--I’m hoping this makes them look a little more rich and fancy.
After getting everything ready, I covered the first piece with glue (I was using Gorilla Glue for it’s toughness and waterproof qualities) then stretched the fabric over the first piece (the plate covering the fingertips). It was a disaster. The glue is really tough once it dries, but it has to be clamped in place to bond. I had hoped to stretch the fabric taut over the plastic and have it stick there, but it just peeled back. I gave up for the night.
Tonight, I will buy some contact cement and try that. I think that will give me the instant stick I want and, I believe, it is also waterproof. I might then cover them a tough outer coat--a polyurethane maybe?
But first, I’ll drill out all the holes to the larger bore I need to drop in the rivets--something I forgot to do last night. I’d love to get these things done in time for tomorrow night’s fight practice… but I’d rather go slow and do them right then hurry and screw it up.
You will find this to be a continuing theme on this blog: I was pretty happy with the status quo until I got squires. I’ve really lucky to have these guys; they push me to improve in practically every way. I mean, I can’t very well let my squires look better than I do on the field, right?
Anyway, my trusty gauntlets gave up the ghost at Blackstone Raids (2007). That is to say, the originally nylon strapping finally rotted away. The kydex itself is still solid. So I undertook the project of fixing them right (i.e., no duct tape!)
First, I had to remove all the rivets. This was a pain in the ass. Generally with a project like this I just grind off the heads using my bench grinder and pop them out. But since the guants are made of plastic, I had to be careful not to heat up the rivet so much that the plastic melted.
I tried dipping them in water every couple of seconds, and even sat them in a shallow pan of ice water while I used my dremel tool tool on them. Finally, I got frustrated with the slow pace and went ahead and let them get hot and just yanked the entire rivet (burr included) out. This damaged the hole a bit, but I’m not too worried since I have to drill out those holes anyway to accept the bigger brass rivets I’m going to use to put them all back together. I’m a little concerned that I’ve weakened the plastic at those holes and the plastic will crack. Time will tell, I suppose.
Before I started taking them apart (actually, long before the nylon finally died) I was thinking of ways I could make my ugly plastic gaunts look decent. My meager research into Rus arms and armor yielded a very interesting item: the Rukavitsa.


They are described as mittens or gauntlets, and were made of leather or quilted padding, sometimes augmented with “metal fishnet” (I’m assuming that’s equivalent to chain mail?) or metal plates. And, as is obvious from the above illustrations, they are elaborated decorated. Very cool.
So I had to decide how to recreate that with my plastic guants. My first thought was to just make fabric mittens and slip them over the (repaired) gauntlets. With a lightweight suede for the palm, perhaps? However, I had afraid they would look bulky and wouldn’t work well -- and, I image they would be really hot. My hands get sweaty enough without adding another layer of non-breatheable fabric. So, I decided to simply cover the individual plates with fabric.
Last night I thoroughly washed everything and got all the duct tape residue I could off, then cut out fabric to cover them. I was lucky in that my wife, Serena, had cool fabric in the scrap box I could use. I choose a nice red brocade-like fabric (I honestly have no idea with it really is). The Rus loved the color red, and that will made a nice dramatic color highlight to the rest of my rig. I also choose a patterned green to cover just the cuffs--I’m hoping this makes them look a little more rich and fancy.
After getting everything ready, I covered the first piece with glue (I was using Gorilla Glue for it’s toughness and waterproof qualities) then stretched the fabric over the first piece (the plate covering the fingertips). It was a disaster. The glue is really tough once it dries, but it has to be clamped in place to bond. I had hoped to stretch the fabric taut over the plastic and have it stick there, but it just peeled back. I gave up for the night.
Tonight, I will buy some contact cement and try that. I think that will give me the instant stick I want and, I believe, it is also waterproof. I might then cover them a tough outer coat--a polyurethane maybe?
But first, I’ll drill out all the holes to the larger bore I need to drop in the rivets--something I forgot to do last night. I’d love to get these things done in time for tomorrow night’s fight practice… but I’d rather go slow and do them right then hurry and screw it up.
Subscribe to:
Posts (Atom)